This wire wrapped jewelry clasp always gets a thumbs up from everyone who sees it – and it’s very easy to make!
You’ll need these supplies:
- wire
You’ll need these tools:
- hammer
- steel plate or anvil
- Bent nose or chain nose plyers
- flat nose pliers are optional
- round nose pliers
- file
Directions for the Tutorial:
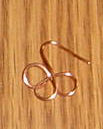
1.) Cut 2 inches of wire with your flush cutters. Make a loop and flatten it.
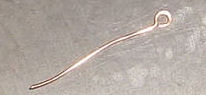
2.) About one half of an inch up from the loop grasp your wire with the base of your round nose pliers and make a loop.
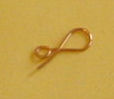
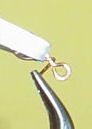
3.) Wrap the end of the wire at least one full turn just above the smaller loop. I used my flat nose pliers to hold the large loop while wrapping. You can use your chain nose pliers. Hammer the larger loop flat at the curve.
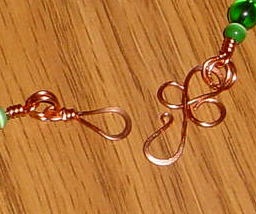
4.) Begin by making the clover the same way you make clover links, with one exception. You need to make the leaves of the clover in a clockwise fashion so that the open leaf is not across from the open hook. Look at the picture at the top of the page to see where the 2nd open leaf is. You don’t want this across from the hook because that will make the clasp less strong.
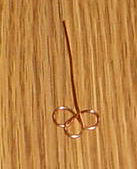
5.) Loop the hook letting the wire stick straight out so that you can work with it.
6.) Hammer and round up the tip of the hook part of the clasp. Then hammer the round parts of each loop to harden the wire. I flatten the loop of the clasp, but you can just tap it until it is hard if you wish.
Look for Supplies on Amazon:
Jewelry Making Supply Tools & Kits
Jewelry Making Charms
Jewelry Making Beads
Jewelry Making Ear Wires
Jewelry Making Spacer Beads
You May Also Like These Projects:
 Wire Wrap Jewelry – Wire Swirls Bracelet
 Chips and Pearls Wire Wrapped Bead Bracelet – Make This Beaded Bracelet
 Wire Wrapped Double Swirls Beaded Earrings
 Wire Wrapped Coral and Mother of Pearl Earrings – Free Pattern
 Wire Wrapped Double Bead Triangle Earrings
 Make a Bead Drop
 Frog’s Pond Lampwork Bead Earrings – Beaded Earring Tutorial- Free Pattern
 Blue Bells Dangle Bead Earrings Tutorial – Free Bead Project
 Make a Beaded Bracelet Project: Coral and Mother of Pearl Bracelet
 Red Tiger Eye Drops Earrings Tutorial – Free Bead Project