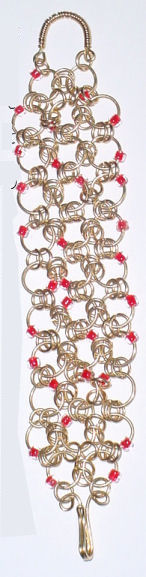
This fun chain maille / jump ring bracelet has quite a bit of play in it – hence the name. If you’re making all of your own jump rings, it takes some time to complete, but it is so worth it. This is a simple Japanese technique chain maille. This type of chain maille makes nice angles.
You’ll need these supplies:
- 22 and 18 gauge gold tone wire
- size 8 seed beads or E beads
You’ll need these tools:
- Bent nose or chain nose pliers
- Flat nose pliers
- round nose pliers
- file
- size 7 and 13 knitting needles
Directions:
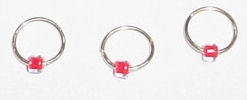
1.) Using the size 7 and size 13 knitting needles, make jump rings. The size 13 makes about a 10mm jump ring, the size 7 makes about a 6mm jump ring. You will need 31 – 10mm and 104 6mm jump rings to make a 7.25″ bracelet. When work hardening the 10mm jump rings, put on a bead. Connect the rows as shown in the pictures below. Make nine rows of three and two rows of two.
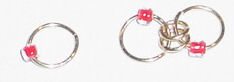
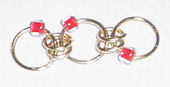
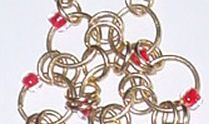
2.) Connect the rows to each other using one jump ring. Then go back and add another jump ring to each link. I found this to be the easier way. Add one of the two-jump ring rows to each end. Using the outside rings on the last three-jump ring row, connect with two jump rings to each ring in the two-jump ring row. The middle jump ring of the three-jump ring row puts one jump ring in each link.(see pic)
3.) Make a two-strand coil clasp. Connect with jump rings.
4.) To make this bracelet larger or smaller add or subtract a row of jump rings. Enjoy!
Look for Supplies on Amazon:
Jewelry Making Supply Tools & Kits
Jewelry Making Charms
Jewelry Making Beads
Jewelry Making Ear Wires
Jewelry Making Spacer Beads
You May Also Like These Projects:
 Make a Beaded Bracelet Project: Rose Quartz and Pearl Beaded Bracelet
 Make a Beaded Bracelet Project: Autumn Crystals Beaded Bracelet
 Cat Memory Beaded Bracelet Beaded Bracelet Instructions Free Pattern
 Make a Beaded Bracelet Project: Crackle Glass Stretch Beaded Bracelet
 Mini Drops Bead Bracelet Tutorial – Make This Beaded Bracelet
 Party and Pearl Bead Bracelet – Make a Beaded Bracelet Project
 Blue Chain Drop Bead Earrings to Make
 Make a Beaded Bracelet Project: Autumn Leaves Bracelet